My question is, is it possible to replace the new genetics without dealing with clones in the bin? Sorry this is a mess, Google has so far given me the one method I mentioned previously. Ask 2/2
Hello, complicatedmerary! There is indeed a way to simsurgery the premades without having the clone clutter up your neighbourhood’s family bin. I tried to look for the tutorial that taught me how to do it but I just couldn’t find it, so I made my own. Hope you and others can still understand it.
Edited 4th July 2019: I forgot to give a heads up that the plugin will override a sims genes with what the clone sim has on. So if you would like a sim to carry both parents genes and not just what they have now, here’s a tutorial that shows you how to edit a sims DNA (link)
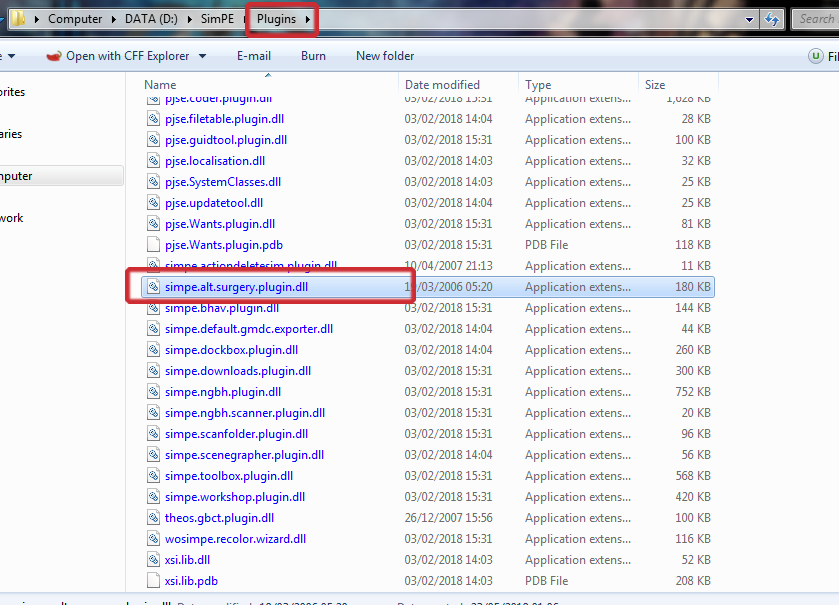
1) Your gonna need to download this SimPE plugin by Theo, that allows you to use a Sims package file (The file that bodyshop stores in SavedSims Folder, whenever you save a sim/projects) to replace another sims feature. Make sure you then place the plugin inside SimPE’s plugin folder, as shown below.
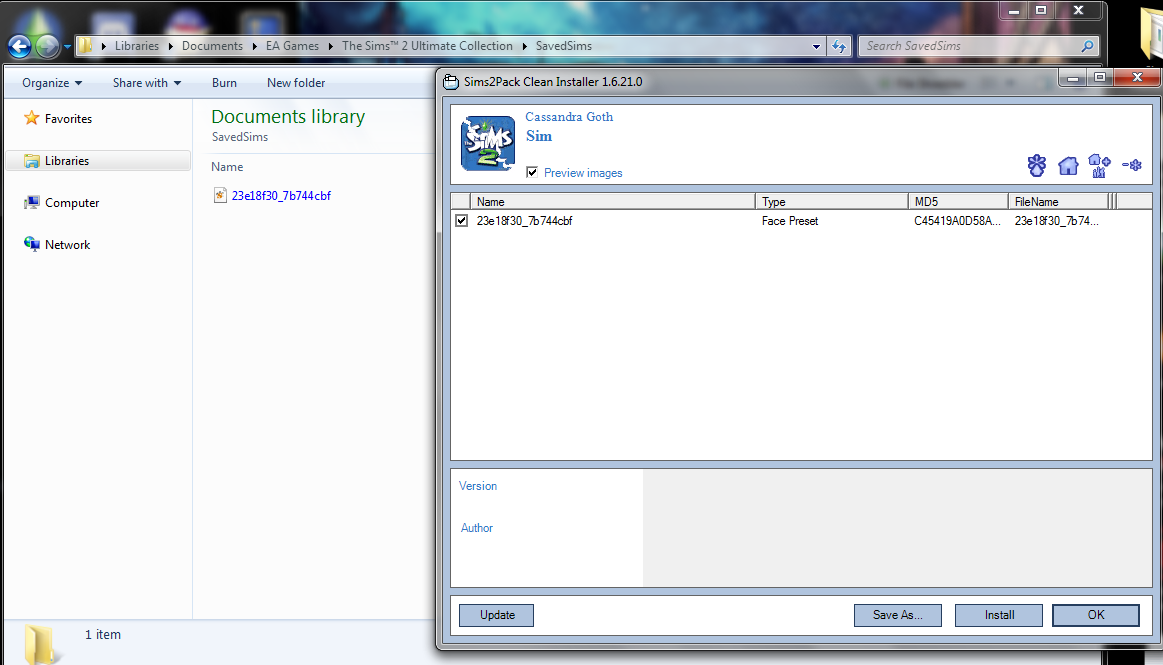
2) Because I shared the GC sims in Sim2Pack files. Your gonna need to “install” them in order to get their sims package file. Place their sims package in a folder you’ll remember and rename each sim package. If your gonna replace a bunch of sims your gonna need to know which sim package is who’s. The plugin doesn’t show a preview of the sims in the replace tab.
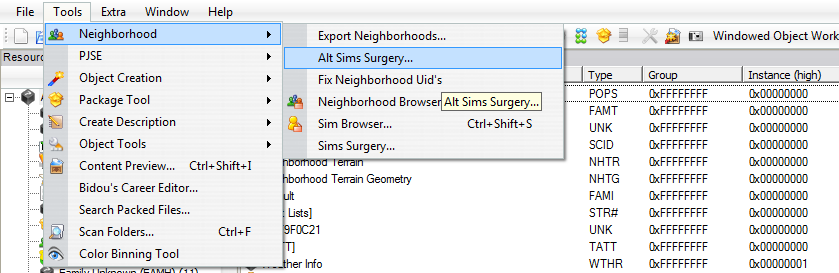
3) Now you can open up SimPE and after opening the neighbourhood that has the sim/s you wish to replace with open Tools –> Neighbourhood –> Alt Sims Surgery
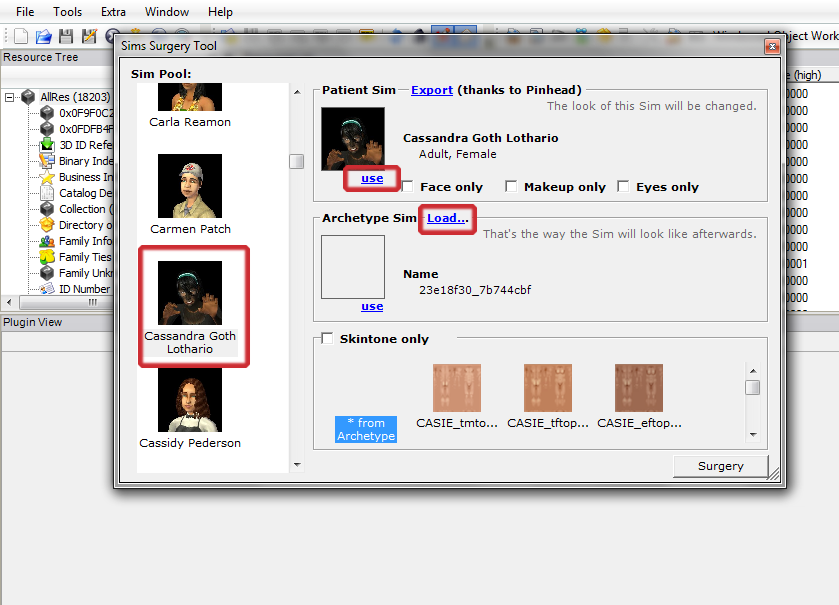
4) Once it finishes loading your then gonna search for the sim you want to replace in the sims pool (on the right) and select their profile pic and then click use on the Patient Sim tab. Then on the Archetype Sim tab, you click on load instead of use, you then go to the folder you placed the sim package file (of the sim you wish to replace with). While the picture won’t show up, you’ll know you loaded up the sim when you see the package filename being shown under name.
From there you can choose if you want only certain features to be replaced (like clicking the face only tab so that only a sims face feature is replaced while the rest stay the same) if your happy with the Archetype Sim replacing everything (Everyday outfit, Makeup, DNA and Face Feature) of the patient sim then don’t click on anything else and just click surgery, on the bottom right corner.
And now when you load up the neighbourhood, you’ll see your sim replaced with the look you wanted and not have to worry about clones walking about.
Excuse the lame pic lol, I just wanted to show proof and my excitement!
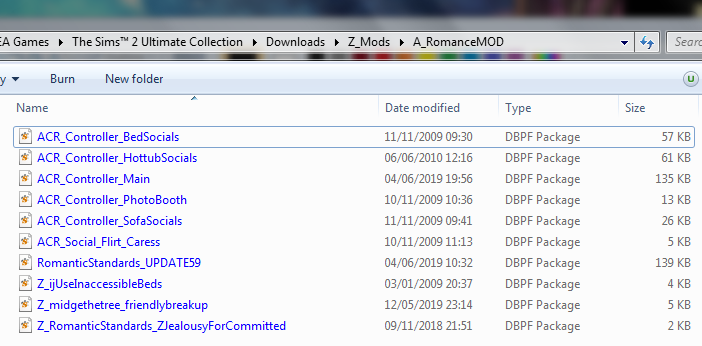
Now, are you a Romantic Standards mod user that loves how it treats your sims’ relationships but miss the surprise baby that ACR adds with auto risky woohoo / try for baby feature? Well, I got news for you!!! You can finally have the best of both worlds, thanks to @midgethetree helpful guide here
Edit 5th June 2019: Here’s a download link for those asking for the edited ACR. Please note that I disabled booty call on this edit since I personally didn’t need it. Also, I had the mods be read first before Romantic Standards (like shown below) not sure if that helps make them work.
Edit 28th October 2021: Edited ACR with the Booty Call still in is now available (here). Haven’t had time to test if all is working as it should so please warn me if something isn’t working. Should be fine since all I did was turn it back on.
I wasn’t able to play around with it enough but there were some few things I noticed that maybe you guys would like to know.
The edited ACR works enough to not mess with RS relationship threshold. So it doesn’t cause random strangers to go and flirt, make-out and/or woohoo as soon as they meet each other. Had to wait till these two got comfortable with each other before they auto woohoo-ed (But anyone that has used the mod for a while now knows it’s more challenging to get another sim to allow romantic interaction under certain settings). Not sure if it’s slightly easier for romance/pleasure sims to auto woohoo.
I got one couple that only had a crush with each other but high STR/LTR also try an auto woohoo but it allowed a sim to reject it, when they were about to woohoo, in the end. So RS can block it if they didn’t pass the threshold like a normal woohoo. I haven’t seen other crush only couples do this so I can’t confirm if that’s what caused it.
The couple above only started to keep auto woohoo/try for baby-ing once they were at least in love. They both fell in love at the same time so I’m not sure if it can still happen if only one is in love. But it should. Because when I only had RS in my game, it allowed some of my couples to woohoo even tho one of the sim wasn’t in love with the other yet, it just depends on the threshold.
You’re also unable to push auto woohoo until they’re in love. So it doesn’t seem like getting two sims that have low chemistry and STR/LTR to woohoo is gonna be easy if they just aren’t into each other.
If one sim prefers to woohoo in the nude but the other sims has the never nude trait from @hexagonal-bipyramid then it’ll respect that and you’ll see the never nude sim with their swimwear while the other will keep their prefered clothing.
Switched eyesets and need to update all those townies? Want to switch up your Sim’s eye color? Then hop on in and read this tutorial. Made this tutorial for @emmelfish and for others who want to do the same.
Difficulty: Easy to Intermediate (as long as you BACKUP YOUR HOOD!)
Just a little tip: If you open up a folder in your downloads and don’t know, what exactly you’re looking at, use Simwardrobe’s Categorizer to create a preview image. In the red box you can see the file’s name.
EDIT: This works only for buy/build-mode objects.
EDIT2: I realized just now, that simwardrobe is down! But this great community has our back… With backups on
simfileshare! (Navigate to “Programs”
and download “Sims2Cat01.01.11.zip”) Thank you
Bulbasaur001!
However, I don’t recommend to use the programm to actually edit files. It has too many bugs for my taste.
If you saw my post (here) about a mod that came out that fixed the glitch but you weren’t happy that it used the try outfit out from booths, I got news for you! From the very creator of the mod, simler90 has found a way that fixes that without needing to use the mod. They explained in words how to do it plus other important details (here) but I thought a picture guide would be a good thing to share 🙂
Some things to note:
I saved and quit the game after doing the fix to see if it stays or if I have to fix it every time I open up the game, happy to report it stays fixed!
This fix isn’t just for townies employees, you can do this to playable sims as well.
There is one issue that makes the glitch return, simler90 explained this in details. Please click the 2nd link above to read what it is.
How to Play The Sims 2 in Windowed Fullscreen Mode
The Sims 4 has a “Windowed Fullscreen” mode (also known as Borderless Fullscreen” mode), or a kind of mode that looks like Fullscreen mode, but is actually a Windowed mode without the window borders.
This will show you how to do this in your TS2 game (will likely work with TS3 as well)
Hi there! I’m sorry for a late reply. I’m so terrible at Photoshop myself. Probably the only thing that you should know is to use a high quality pattern. I find mine mostly on Colourlovers. Also, when you overlay your pattern onto a clothes texture, don’t forget to change the mixing option (pictures are under a cut for visibility). Hope that little tip helps. that’s really all you have to know while recolouring clothing 😀
Hey penguins, wanted to follow up with my previous post about my Sims 2 crashing and the tricks I used to get it working again! Since applying them, I haven’t had one crash or purple flashing since! (At this point, I have played the game several hours, switched households multiple times and loaded a ton of lots to make sure the issues are gone)
Tip#1: Make sure to check that your Graphics Card is listed in the Video Cards.sgr files in your Sims 2 installation folder! If not, use the Graphics Rules Maker, add your GPU to the list and double-check that it HAS been added there (I had problems with this and had to do it manually in the end!). Make sure to copy the new Graphics Rules AND Video Cards files to both folders in the installation location (Config and CSConfig).
Tip #2: Make sure that you have to correct texture memory amount assigned for your game! If you haven’t already, run DxDiag on your computer ( https://support.microsoft.com/en-us/help/4028644/windows-open-and-run-dxdiagexe ) , click “Save all info” on the bottom and save it on your desktop. Open and check your Display Memory under “Display Devices”. That Display Memory is the amount you need to change for your Graphic Rules-files. See Leefish post for more info: http://www.leefish.nl/mybb/showthread.php?tid=7909
Tip #3: If you have applied the “4 gig patch”, make sure that it is working properly.
Check your Documents > EA Games > The Sims 2 > Logs folder and
open a file called “COMPUTERNAME-config-log”.
If the memory under “Machine info” (top of the list) is anything less than 4000MB (mine says 4096 MB), the patch hasn’t been fully applied. Jessa shows in this VIDEO how to download AND fix the patch: https://youtu.be/-0iwuLZyjMg
Tip #4: Especially if you are playing on Windows 10, make sure to do the Memory Allocation Fix that Jessa shows in the video above! You NEED this! This fix also helps Windows 7 users!!
Tip #5: (Not sure if this is necessary after applying #4, but I did it before I fixed the memory leak issue and didn’t have any crashes after that either) Make sure your Virtual Memory amount is set high enough in Control Panel > System > Advanced settings > Advanced tab > Performance settings > Advanced > Virtual Memory. Set the custom amount for your main drive to be 25,000-30,000 and click “Set”.
=== Thanks so much to Gina for this tip!===
I’m listing here all the tricks I did both for you guys and for myself aswell, in case I need to go through this whole thing again at some point in the future (after switching Graphics Cards, which thankfully won’t happen in a few years!). Hopefully it’ll be useful and helpful for you guys!
Special thanks to Jessa, Gina and everyone on Leefish forums for all the useful information and tips on how to fix the graphical problems!
Now, on to more Sims 2 livestreams!!!
Very important note: Make sure to MOVE (not copy) the executable to the CSBin folder. Otherwise the 4GB patch will not stick at all.
Another note: if you still can’t get the patch to stick, make sure you disable any compatibility settings you have then try again.
This will be a series of resource posts for Simblrs who started from other games who want to start playing TS2. This first part is mainly for essential programs and mods.
caramelsmiles was having a hard time doing an AF to TF (this works as a AM to TM too or AM to AF or AF to AM – point being Adult to Teen) conversion and posted about it on GoS. I figured if one person was having a tough time, then many people may be too! So I decided to write a (hopefully) easy to follow tutorial (complete with pictures) for you all.
To start, you’ll obviously want to download the mesh you’re converting. And then it would be wise to create a project/work folder so you have all of the necessary files together. I have made a folder within my downloads and it is labeled ‘help caramelsmiles’ and within that I have a sub-folder named ‘Layered Shirts’ where it contains all of the files (mesh and recolors) downloaded from e-neillan.
I made a Sim from Bodyshop and used the Alt Sim Surgery plugin tool to make the servo look like them. The skintone can be found here(it’s at the bottom of the page, silly Photobucket removes the pics).
You don’t need default replacements to customize servos, but if you want to know what I use, the “unitialized” servo replacement can be found here (I use Spiderviveka’s matte version). The “initialized” one can be found here. These replacements textures are the same as the skintone mentioned above.
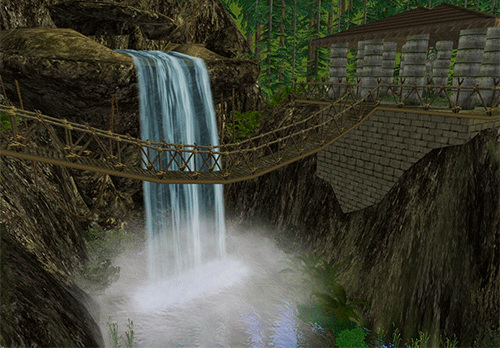
Some of you asked about this type of suspension bridge and how to build it. I want to make a tutorial soon. In the meantime you can take a look at this tutorial I found on Youtube, but you need to do some things differently:
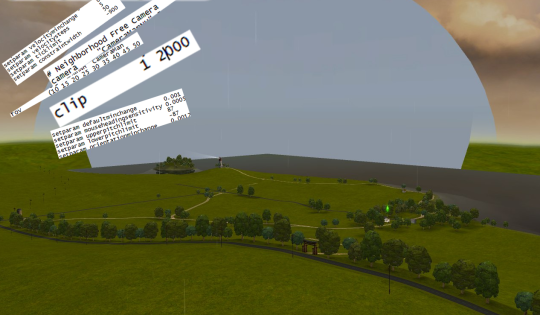
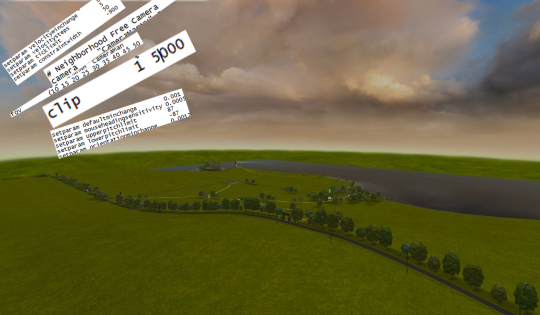
This is the clipping issue, that can be fixed by changing the “clip” param in the cameras. The default values for nhood camera from FirstPersonCamera.txt, for example:
That happens to me if I move the camera far away from the lot and look around a bit. I use a custom lot camera however. But if you have the standard camera and already have problems seeing the skyline within the lot area, you might consider using a custom camera for lot mode. I don’t know how to fully fix this problem and I don’t know if it’s really related to the camera, but I’d give it a try (custom cameras are great so it will be worth it!).
I felt the sudden urge to create my own basement tutorial. So I did. Basements, basements, basements! Some people love them, some people hate them and some people are confused about how to make them (I’m a poet)! So now I am going to teach you how I do it + at least one bonus tip/trick you maybe didn’t know about…? 🙂
It’s rather picture heavy so I put it on a page of its own, because that’s sensible.
I screwed around with this a long time ago when I was making a fancy palace for some godforsaken reason. I wanted it to have a big, grand concrete staircase outside, but the railing that’s “attached” to the concrete modular stair is decidedly not palace-like. So I fiddled around and figured out how to make a fence (or a half-wall; they work the same way) look like stair railing. So, behind the cut is how to do it. With lotsa pictures. It requires the constrainfloorelevation cheat, but not in any scary way. If you can count to 12, you can do it. I promise. 🙂
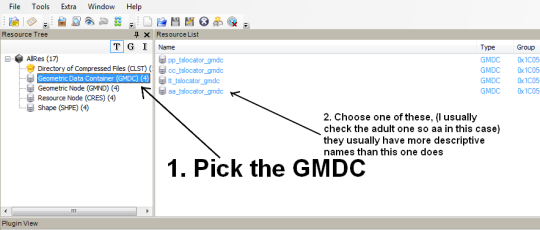
Yep, it’s even pretty simple, you need SimPE (never mind the broken site, the download links still work) Then open the mesh file in it and pick the line that says (GMDC):
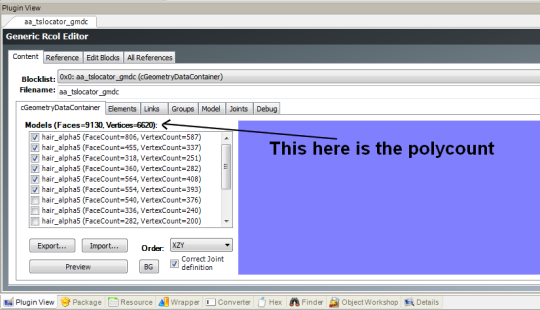
Then choose one of the files showing up from that list, they usually have more descriptive names like creatorname-meshname-originalhairitwasclonedfrom but of course the random one I chose had to be one of the badly named ones. Below that you can see the plugin view, (if not, click on that tab at the bottom to make it visible)
and there you can find the polycount for the item, it’s the Faces number, apologies for my slightly misleading arrow. Other ages/genders are usually about the same size as the adult one so I only mention the adult ones when I post hairs. The same method works for accessories and clothes too!
edited to add the note about faces = polycount, thanks kkayleighh for pointing that out. :3
Whaddup ppl! Right before my forced finals hiatus I promised a very sweet anon some posing tips but “studying” aka being on the verge of a mental breakdown got in the way. Well now that the nightmare is over and I can once again face the world with the confidence of a person that has a will to live, I thought why not go all out and do a step-by-step tutorial instead of just giving stray tips? So I put together this mini-tut where we’re gonna sloooowly pose the above pic and I’m gonna try to include things I wished someone had told me starting out lmao. It’s kinda of a mess but I hope you guys find it at least somewhat helpful for your pics/stories? Here we gooo
So you’d like to merge (or bundle) your sims 2 cc? Merging packages is a great way to speed up your loading time, but please keep the following in mind:
– You can’t un-merge CC, so you better be damn sure you’ll want to keep it. – You can’t use the in game trash function on merged CC – You can’t merge everything (”you just can’t, Nemo”) – Merging your Mods is probably a very bad thing. – Back Up your game. Seriously
Also, Almighty Hat talks about merging in this tutorial. Scroll all the way down. I recommend giving it a read.
Alright, let’s do this thing! (My kid has been watching too many pixar movies. Spot the reference)
Got a few questions on how to remove the dreaded “black spots” that can occur during conversions, so here’s a quick little tutorial on how I do it. 🙂
To note: this only works for clothes without back faces! (or if the inner layers are a separate group from the outer layers.) So this won’t work with hairs! For hairs, you’d have to actually pull apart the front and back layers into different groups!
^ Oh this is the same method I use but explained way better than I could ever explain and with pictures too! 😀
I can now fix my first dress I converted! Going to try this soon! Once I get my internet at home fixed I can then upload the fixed versions of the dress too.
I remember reading somewhere that the file limit in a single folder in ts2 is 200 files, so you gotta organise your dl folder so that no folder exceeds 200 files or it’ll crash. I remember this now because it just happened. xD
I hope I don’t get chased out of here with a stick, but guys just a reminder…
filenames with SPACES, HYPHENS, BRACKETS, PARENTHESES, PLUS SIGNS, AMPERSANDS, pretty much anything OTHER THAN AN UNDERSCORE, makes your game load up even slower than normal.
I’m only saying this because I’ve tested it numerous times in my game and even with 20K+++++ files in my DL folder, it takes one minute flat to load my game if all the file names are short and use JUST UNDERSCORES.